You've had a play with some CAD packages and have sat through some tutorials. That's all well and good but you need to know what parts need to go into a robot. In this post we are going to look at the most basic of setups to keep things simple. A simple rammer with no weapons. Now of course this wouldn't be allowed on the show as you have to have an active weapon (it's in the rules) but we will build up to looking at weapons in later posts.
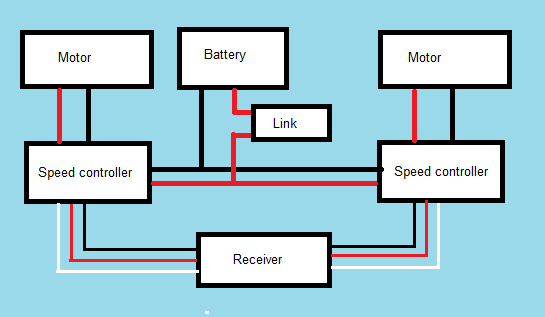
schematic
Please excuse the simplicity of our schematic below but it will give us a basis to talk through a basic robot.
Battery
No matter what battery chemistry is used, only batteries that are non spill are allowed in the arena. This is to stop any accidents involving acids if the robot is tipped upside down. Therefore the car battery that you thought was ideal to use I'm afraid will have to be put to some other use.
Older battery chemistries
Traditionally sealed lead acid (SLA) batteries, nickel metal hydride (Nimh) or Nickel Cadmium (Nicad) batteries were all that was available the robot builder.
Sealed lead acid
SLA batteries are very heavy however using batteries such as the hawker odyssey gave the potential for huge current draws. If you used these in your robot you were typically looking at either the 13Ah or 18Ah versions which would give you anywhere from 12kg upwards of batteries in your machine to run on 24v which is a huge percentage of the weight limit. This means less weight for weapons and armour!
Amp hours
This seems like as good a point as any to talk about Ah or amp hours. Essentially this is a measure of the capacity of a battery. This is the number of amps that the battery should be able to give you constantly at the batteries rated voltage for an hour. In a perfect world the battery would be able to give you double this current at 30 minutes and four times the current in a 15 minute window. So for a 13Ah battery you would get 26A for 30 minutes and 52A for 15 minutes. This isn't strictly true in the real world but it gives you an idea of how much current you can expect to get for a period of time out of a battery.
Nicad
Nicad batteries are no longer sold in the EU and so we won't even consider them as an option here.
Nimh
These batteries are still used by a select few machines. They provide 1.2V per cell. These cells are then linked in series to form larger batteries with typically 10 cells giving you a 12v battery. Nimh can provide moderate current draws and require a charger with the ability to charge them. They are however an outdated battery technology and not one we would recommend investing in.
New battery chemistry
Newer battery technologies relying on lithium are the go to choice nowadays for the robot builder. The actual technologies available can get a little confusing due to the differences in chemistry and cell voltages.
As stated in the rules, lipo batteries need to have a fuse which is rated to below the burst current for the pack. In the above diagram this would be located on one of the main lines coming out of the battery pack.
A123 or LiFePO4 (3.6V per cell)
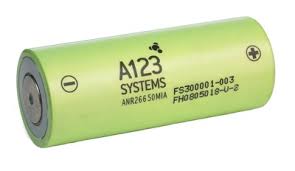
The A123 systems were some of the first to come along when it came to lithium technology. The first robots experimenting with them appeared in the arena around the 2006 to 2007 time. The best source originally for these cells was from dewalt 36V lithium battery packs. John Reid, the builder of TerrorHurtz does a great write up of the cells and how to put together a pack yourself here.
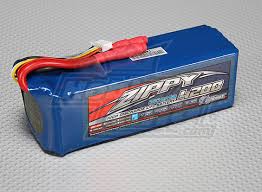
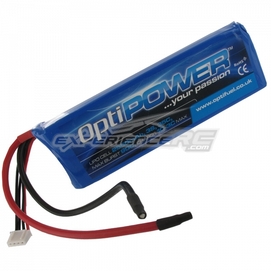
The other picture shows a modern equivalent pack. The cells in these packs are long and flat. You will notice there are two thick leads coming out the top along with several smaller leads that all hook up to a plug. The large leads are the positive and negative sides of the battery with the smaller leads being hooked up to each individual cell. With lithium cell technologies it is important to balance the cells to make sure they are all charged within 0.05v of one another. If they start to unbalance then you can end up with the entire battery pack at best reducing it's effective use quickly or at worst go up in flames. Whenever charging lithium batteries they must be charged in a lipo sack. This is a special sack that is designed to contain any fire if something should go wrong during the charging process. These can be picked up cheap from RC stores and ebay.
The advantage to these cell chemistries in particular is that they are more stable than some of the other lithium based batteries. The majority of the teams in the USA prefer to use these cells with tombstone using them to great effect. They however can't provide quite as much discharge current as some of the other technologies below. For this reason, PP3D robotics sticks with Lipo technology.
Lithium Polymer (Lipo 4.2V per cell)
These cells are the go to cells for PP3D robotics. They have a higher discharge rate than the LiFePO4 cells and are typically around the same size for a given capacity. You will notice these batteries also have main leads and balancing leads.
When it comes to all lipo cells, the discharge rates are typically given using the unit, C. The same goes for the recommended charging rate for the cells. To figure out the charge / discharge, you multiply the capacity figure by the C figure. So a 8000mAh pack with a 30C discharge will be able to supply, 8000mA x 30 = 240,000mA or 240A discharge.
The cell count tells you the voltage of the pack. By multiplying the number of cells (generally given the units "s") by 4.2V for lipo, you can figure out the pack voltage.
They also require balanced charging and must be charged in a lipo sack. The downside to these cells is that they are more volatile than the other lithium chemistries. This means you can end up in a chompalot situation if you aren't careful. Thankfully this has never happened to us as we always ensure that we pad the batteries using foam (a £5 argos camping mat cut up works well) and ensure they are well secured with appropriately rated wiring.
Speed Controllers
Speed controllers are a complex topic that an entire blog could be devoted to. However for the majority of roboteers there are a few things that you should know which we hope to cover here.
What is a speed controller?
Essentially a speed controller is the electronic interface between your radio receiver and the motors it will power. They allow for variable control of motors rather than simple on / off control. This is the part that people most worry about when it comes to robots but they are single housed units that require hooking up to a few inputs and outputs and you are good to go!
Selection
To keep things simple, there are a number of tried and tested speed controllers available for heavyweight robots. We will stick to heavyweights as that's what Robot Wars is focused on. Controllers that have been used successfully include,
- Vantec RDFR47E or RDFR36E (Dual channel)
- Roboteq (various models available including single and dual channel)
- Wotty (Dual channel custom controller made by Iain of Bigger Brother / Orte)
- Ragebridge 2 (Dual channel)
- Robot Power Vyper 120A (Single channel)
There are various other controllers available and by having these here it shouldn't be taken as an endorsement of any controller over another.
When selecting a speed controller there are a number of things you need to be aware of,
- It's physical size - will it fit in my design?
- Will it run at the voltage my motors will run at?
- Can it withstand the current that my motors will draw? Some controllers come with current limiting, some don't. We can go into more detail on this in a future post.
- How will I shock mount it?
- How may channels does it have? Channels on a speed controller essentially refer to the number of independent motors that the control is able to control. A single channel controller can control a single motor whereas a dual channel can control two independent motors. If you plan to have a motor either side of the robot which is the standard set up then you will need either a dual channel controller or two single channel controllers.
- Does it have a BEC (Battery eliminator circuit)? Traditionally you needed a separate battery to power your receiver. Nowadays it's much easy to either have a speed controller that will power the receiver or a separate BEC circuit.
All of the controllers on this list come with standard servo wires that will plug into any conventional hobby radio receiver which is what the majority of roboteers use. We will go into more depth on the radio side of things in a future blog post
We are going to end this post here so that we can get it out and keep to our plan of one a week.
TO BE CONTINUED......
TO BE CONTINUED......
Like what you've read? Want to support PP3D Robotics? How about getting your name on the new discs for PP3D? How about owning part of the robot that appeared on Robot Wars 2016!? Then head over to our kickstarter!
https://www.kickstarter.com/projects/583580427/pp3d-upgrades-for-series-2-of-robot-wars
https://www.kickstarter.com/projects/583580427/pp3d-upgrades-for-series-2-of-robot-wars


 RSS Feed
